Showing posts with label crafting. Show all posts

12.12.2012

4 down, 4 to go.

family hanukkah
We're smack dab in the middle of Hanukkah right now. And, as Naomi pointed out last night as we lit the candles--the days go too fast. I suppose that's what happens when you fill them to the brim with fun little activities.
downtown hanukkah
balloon man at the downtown lighting of the Menorah 
felting balls with kids
So far the crafts have included making dreidels out of clay. Trying our hand at German paper stars. Felting balls in hanukkah-ish colors. Coloring printed out coloring books. Making Sugar Cookies and today decorating them. Tonight latkes, hopefully sufganiot (donuts), assembling our felt balls into a garland of some kind, and a few more are on the list for the week.

If we run out of ideas there's always pinterest, and the ideas we've used in years past. 8 days can seem a little daunting, but when you get to it it turns out there's always more fun things to do. And with everyone around doing special crafty things for whatever holiday they celebrate, there's a plethora of ways to alter and rework to make them appropriate for the Festival of Lights. 

spinning 
melt-in-your-mouth shortbread

Short-Shortbread recipe:
1 1/2 cups butter at room temperature.
1/2 cup sugar
4 cups flour

preheat oven to 350F. Cream butter and sugar. Add in flour and mix well. If it doesn't come together in a roll-out-able fashion add 1/2tsp of ice water at a time until it does. Usually no more than 1tsp is needed. Roll about 1/4inch thick and cut with the cutters of your choice. Or stamp and cut. Bake about 15 minutes, they don't need to brown too much.

Chag Semeach Hanukkah!

10.24.2011

Homes for Crickets and Toads.

There are many things to share from our week long Sukkot camping adventure, but to delve into it all is a little overwhelming. So, I will pick one thing that actually calms me just thinking about...
We built a village. The little ones napped and Drew, Naomi & I sat in the shade 'round a mossy spot and used sticks and stones and pine needles and acorns and leaves and built a little fairy village. It was utterly relaxing and a great way to open Naomi up to ingenuitive thinking.
It surprisingly nice and simple and only one of the very fun times we shared through the week, but as I look through the pictures (it was well documented, Drew & I took turns trying to capture it perfectly) I feel the calm of the process...
I can't think of a better way to encourage imagination. Perhaps there's a cricket or a toad making themselves cozy round the fire right about now. This will be a new tradition to help us sit and enjoy our days outside. I think we may start treating them like GeoCaches so others can look for them--wouldn't that be a fun thing to treasure hunt for? And add to? This article triggered my memory of making them as a kid. And of course, Magic Onions always has inspiring fairy garden ideas!

7.31.2011

Cedar Ring Circle and Homeschooling Cheap.

 
 In thinking about our upcoming school year we had a lot to consider. We enjoyed Oak Meadow and while I think what they offer is great, I wasn't thrilled about paying for all their curriculum and still needing to buy all the supplies and crafting materials. I guess I'm a cheapskate, but I think I also just wanted to explore our options. So, even though I was surprised to find my daughter and husband in their recent ad in Living Crafts, (though we HADN'T won their photo contest for free curriculum?! anyone spot them?) we are moving forward.
Enter: Cedar Ring Circle. If you've not been to their site or joined the co-op you may not know that they offer homeschooling packages through their online store for the general public, and discounts on supplies, books, and Little Acorn Learning guides for co-op members. They were one of our other options, and we were privileged to win a month's free in March and we loved it. The major hitch for most Waldorf influenced curricula is the heavy focus on holidays that we don't really celebrate--it's no one's fault, but the major thing in OM's favor was the lack of that. We fill in the holidays on our own, and we are happy that way.
So, CRC offered a package that accompanies the Earthschooling curricula; the price is great and the package is HUGE! The price of Earthschooling's online resources is reasonable as is, but we were given a discount on that as a result of purchasing CRC's bundle and all in all we came in around $300 for all the materials we should need for next year. This is big. While we may not be the best at strictly following any lesson plan day to day, it is a great relief to have a guide and reference point through the year AND the materials to boot! No more skipping projects because we're missing one or more of the bits and pieces.
Cedar Ring Circle has generously offered to giveaway one free membership to the co-op ($25 value) to one of you lucky readers! Take a look around their site and tell us what you'd be excited to get the member discount on and comment below for an entry. Winner will be announced, Tuesday August 9th.

(make sure we can get in touch with you!)

7.22.2011

Tomato Paper Craft

As we harvest, eat, and process the endless supply of tomatoes from our garden, Drew thought of a fun activity making use of tomato peels. The girls loved it, and the outcome is like stained glass...

Many recipes for canning tomatoes call for peeling them, which makes for much smoother sauces, salsas, etc. But instead of throwing them away,
lay them out, press them (we used 2 cutting boards)
and hang the result in the window!
notes: using waxed paper, pelon or some other non-stick material would work better. We just used regular scrap/printer paper and in some places it didn't peel off well. It takes almost 2 days for the tomato peel paper to dry thoroughly, so be patient! And, tomatoes aren't the only produce that make great peel-paper...

6.25.2011

Broccoli Fireworks

Supplies: Paper, tempera paints, and broccoli.
Naomi and I have been doing a lot of paper exploring. Mainly Naomi. It's hot outside, somewhat dreadfully hot & if you can manage to beat the heat it's still hard to ignore the blood sucking mosquitoes that swarm human flesh...so, inside we have paper. Origami, collage, drawing, painting, stamping...we've been doing a little of everything.  
on black or dark paper might be a cool effect--more like the night sky.
The other day we discovered a fun Fourth of July activity--firework paper. While using a few stray pieces of broccoli that were lying around to stamp(doesn't everyone leave broccoli lying around?) we found that holding them upright made a stamp that resembled fireworks! So, we covered white paper with red and blue fireworks & are prepared to use that paper for anything related to the 4th. We'll be in PA for a family reunion--maybe name tags would be sweet? Ideas?
So, next time you DO have broccoli lying around pick it up and make some fireworks!

1.27.2011

She Knits?

It's true, I've handled the needles a time or two, but I'd never call myself a knitter. Why? well, i'm too distractable. Can you believe that's not a word? (case and point).
Anyway, on my list of accomplishments:

  • Scarf
  • Socks (thanks to the persuasion and patience of my mother in law)
  • Booties (a couple of pairs)
  • Several really bad hats
  • A sweater, that while cute, i cannot get to stay together--course, i made it in my pre-natural fibers days.
  • The most darling felted slippers that would have been perfect had it not been for novice me not making certain it was all wool scraps--they will be made again, and again.
  • And I just cast on another hat, with higher hopes. 
Thanks to ravelry, I think I may keep up with this hobby more regularly. The ability to match free projects from other great knitters to the stash I already have is just irresistible. 
Leviah approves--and is silly with her green drink mustache.

7.27.2010

The Great Pattern-less Skirt

I've been stockpiling fabric for some time, but specifically intended for skirt making for a couple months. I have a few staple skirts that I wear all the time through the summer--some of them quite simple & so comfortable. When I'm at a store with a discount fabric section I'm more or less obligated to buy 1-2 yards knowing it will at least be enough for children's clothing, or a skirt.

Well. This all brings me to confessing that I also recently made a dress. I was so stoked about it & anxious to finish it in time for a party where I just knew I'd impress everyone with an adorable dress made by my own resourceful hands. And I did finish, but it wasn't quite perfect, an adjustment needed to be made to make things line up right & this totally knocked the wind out of my sails (not to mention the less than over the top excitement I got from those to whom I revealed it privately. There was no harsh critique, or condemning look, just felt a reaction that led me to believe the dress wasn't as great as I'd thought)...so. It sits, awaiting the finishing touch that will make it wearable & good.

This has to do with the skirt because skirts are SO much less in your face. I can wear a skirt & someone may notice, but if I don't want them to I can power it down with a flashier top. A dress--now that's all or none, unless it's cardigan weather and, it's not cardigan weather--not even evening cardigan weather, or wee-small hours of the morning cardigan weather.

This is becoming a wordy post for such a simple pattern. But it's a great opportunity for you, sometimes I think you all miss out, due to my lack of worthwhile conversation pieces, on all my honestly inherited wit and sarcasm. I like to ramble & bramble, just ask anyone. But, in my old age & strengthening wisdom that comes as a result, I recognize how misguidedly I've often spoken and so now try to error on the side of silence, especially in mixed company--i.e. the internet.

Watch out, the flood gates may be opening. That is if you're even (still) here...

So, simple-undaunting-nothing shocking in that-skirt pattern.
Get your adorable (& cheap) fabric. Cotton is great, nothing stretchy. Fold in half, right sides together. Lay (fabric) on floor. Find favorite skirt & situate so that one side is along the folded edge of the fabric. Measure out 3 generous inches from the side that is not along the fold & 1 inch above the waist line (make it a straight waist line if it's not already). You can adjust the hem line by adding length there as well. Cut.
Once you've cut, open it up & sew up the hemline using the method of your choice. I fold. I rarely iron.
 Next?  Waistline: fold over 1/4" & iron or sew. Fold down 1" allowing a space for elastic to run & sew.
Get elastic & wrap it around your waist. (tip: hold it together & trying pulling it down over your rump to see if there's going to be enough give. You can also easily modify the skirt by adding a zipper to the seam). Using the safety pin threading method, pull your elastic through your waist seam & sew down on either end.
 Lastly, with right sides together stitch 1/4 inch seam (or 1/2 if you'd like) up the side of your skirt.
Enjoy. Magnifique! Tres bien. No se nada de frances, lo siento.

Simple pattern=simple happiness. The best kind really. & this can reasonably be done in 20 minutes if you live a very direct & undistracted life (lucky you), that's why I wash all my fabric when it comes home from the store. You never know how long you'll have to sew something up--washing & drying takes time and that's a step I never skip! ;) (click here for great tips on pre-washing that I just found)

& I must give credit/thanks here b/c her simple pattern reminded me to refer to my favorite skirt & that got the ball rolling--quickly, which is key because when not enthralled there's a danger I'll move on before completion.

6.12.2010

Easy as Cake!


Yesterday Naomi & I made a cape together. We're working on several 'sewing' projects together, which generally means she takes scraps & cuts/taps/pins/explains to herself what they are while I get the grunt of the actual project done. I LOVE it. It's a true replication of my childhood.

Anyhow. We made a cape & if your child doesn't have one, get to it--seriously! 30 minutes for loads of fun...
All you need is a rectangle of material, approx. 50"x30". Baste/iron down one 50" edge & then fold it over & sew about 3/4" for a chord to go through. (we used yarn, but I think i'll upgrade when I find something better), & finishing the edges all the way around would make it even nicer...

For an added ruffle around the collar: fold the top 50" basted edge down 1.5" & make an additional seem along the top edge (AFTER it's been sewed down). Once you pull the chord this will cinch & make a nice ruffle.

5.06.2010

How to make a Tie Dyed Butterfly Mobile

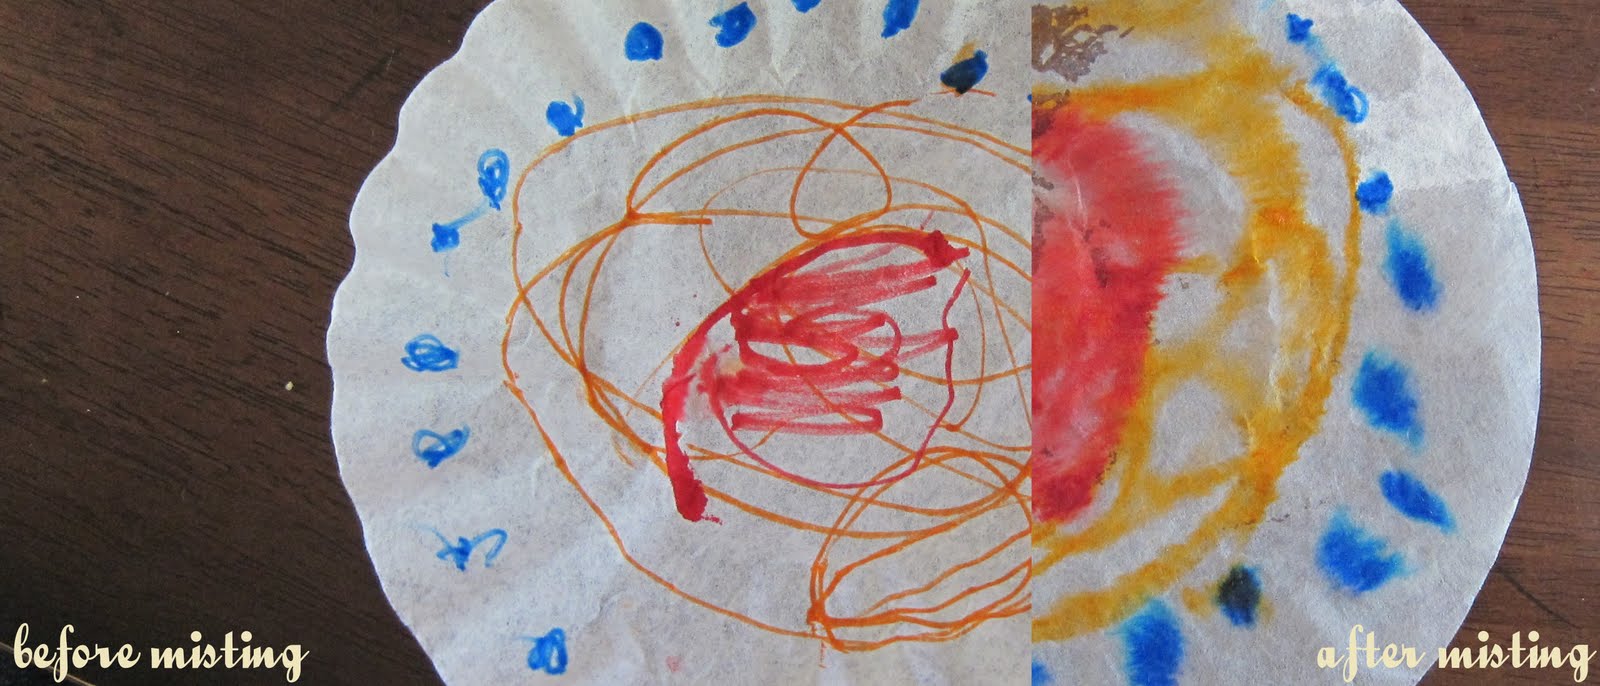
Last week at the Charlotte Mason homeschool group we attend I saw the preschoolers making these simple butterflies to go along with what the big kids were studying.

Anyway, I couldn't help but want to do it with Naomi, and I've been wanting to make a mobile with her, so here we are.

It's a simple project for little hands & requires minimal supplies.

  • Markers
  • Coffee Filters
  • Pipe Cleaners
  • Spray Bottle with water (splashing with your fingers might work, too).
  • Fishing Line
  • Paper Plate
  • fishing line
  • scissors


First, flatten your coffee filter & color away. Patterns, randomness--whichever. (color on the outermost part is more important as the middle section will get scrunched). 
I had Naomi use 2 colors on a couple so she could see what happened when they blended after spraying--great way to teach color theory...(i.e. yellow+blue=green)
So, coloring done, spritz with a bit of water--not too much.

Allow ample time for drying & then scrunch at the middle & twist a pipe cleaner around leaving long ends as Antennae.

You could hang them any number of ways, but since we were already using filters I thought a paper plate would be just the thing & coloring it sky blue also seemed appropriate. Just string a line for each butterfly through the top downward & 1 through the middle upwards as a way to hang it from the ceiling or a tree. A square of cardboard, or like we used, a small section of pipe cleaner tied around the fishing line before it's pulled through the holes in the paper plate keep the line from falling through.

Tie each strung piece of fishing line, hang & wa-lah!
bright & cheerful!

4.27.2010

Making a Spinning Snake Spiral...

oak meadow homeschool
Just wanted to share a fun & easy letter S project for little hands from our curriculum. We had a great time & can't wait for little sister to wake up so we can hang it in their room.
the letter s snakesnake craft
Naomi chose the type of snake (diamond back rattler), although it took on many characteristics & turned into a great way to practice pattern mimicking, which Naomi tends to dislike.
recycled craft

To make your own simply cut a spiral out of an old box & decorate! Add a string to the center (which you can make the head or the tail).

3.30.2010

Leaving Egypt...

'upcycled' Moses (more great Passover & other crafts here)
Leaven Free Desserts
Cleaning up
Headless Felt People from this pattern.

It's Passover this week & we came to Drew's parents for the celebration. We'll be here until Thursday & are playing with felt, going to playgrounds & staying completely entertained while we're in town (Charlotte). What a metropolis! It's fun to see the city life, but our mid-sized Greensboro is the perfect fit for us city-wise.
& we've experienced what feels like a Passover miracle of our own. I will share more with that should it come to fruition, but key phrase: 'Promised Land'.

3.17.2010

Recycled Paper Weaving

::A Simple Afternoon Project:
So you can't keep EVERY painting, coloring page & scrap doodle, but you can re-use some of them! We're all about printing on the back of old copies, painting on trash-mail, recycling unwanted solicitations & today we did just that.
recycled paper weaving
fold a piece of construction paper in half & cut straight lines from the folded edge leaving 1 inch uncut at the top.
waldorf homeschool
cut up strips of scrap paintings, etc. in all different widths.
waldorf education
all materials required.
paper craft
weaving with childrenhow to paper weave
Unfold the construction paper & weave, weave, weave! (we even through in some strands of yarn for fun)

oak meadow curriculum
the finished products are great! Laminated they'd make great place-mats...

A quick & easy project for little fingers (& it was much fun for me too).